With SQL Server 2016, programmatically creating and managing Analysis Services Tabular models has been enhanced with the Tabular Object Model (TOM). TOM can be used to create models, tables, columns, measures, hierarchies, relationships, security and also trigger data refreshes. Why would we want to do this? In a word – Automation. TOM allows us to create/modify Tabular models and deploy to the server from code.
There’s more info on MSDN HERE. The class references are available HERE. For reference, the following tutorial is an extension of an MSDN article available HERE, the changes and additions are:
- Uses the new WideWorldImportersDW SQL Server 2016 example data warehouse database
- Adds Measures, Hierarchies and Relationships to enhance the model
Download Visual Studio 2015 C# Tutorial Project
Tutorial Overview
I set out to create a Tabular model using C# and TOM that featured all the functionality I would expect such as Measures, Hierachies and Relationships. I took the MSDN tutorial and extended it using the new WideWorldImportsDW database. This was a challenge as I consider myself a C# “noob” and I hope this proves useful for others looking to do this too. The next logical step will be to metadata-drive the creation of the objects, however at this stage I feel it’s important to get to grips with the TOM itself.
A big thank you to William Relf https://twitter.com/relfw, who is my colleague, Data Platform expert and C# whizz.
The example model includes
- 2 Dimension tables
- 1 Fact table
- 2 Relationships between the Fact and Dimension tables
- 3 SUM measures
- 1 display folder
- 1 hierarchy within the Date Dimension (Year-Month-Date)
The image below shows a visual representation of the model we’ll create.

Prerequisites
- SQL Server 2016 Database Engine and Analysis Services Tabular installed (Developer Edition is free HERE)
- Visual Studio 2015 (the free Community Edition can be used HERE)
- WideWorldImportersDW SQL database restored onto the SQL Server 2016 Database Engine instance (direct download HERE. GitHub page HERE)
Download & Install the Libraries
- Download and install the SQL_AS_AMO.msi library from HERE.
- Verify the install by ensuring the following files are in C:\Program Files\Microsoft SQL Server\130\SDK\Assemblies
- Microsoft.AnalysisServices.Core.dll
- Microsoft.AnalysisServices.dll
- Microsoft.AnalysisServices.Tabular.dll
- Microsoft.AnalysisServices.Tabular.Json.dll
Creating a blank C# Console Application and Adding the Libraries
- Open Visual Studio and create a new Visual C# Console Application called TOM WideWorldImporters
- Add a reference to the TOM libraries:
- Right-click the References folder in Solution Explorer and click Add Reference
- Click Browse and go to the folder C:\Program Files\Microsoft SQL Server\130\SDK\Assemblies
- Select the following 3 DLL files
- Microsoft.AnalysisServices.Core
- Microsoft.AnalysisServices.Tabular
- Microsoft.AnalysisSerivces.Tabular.Json
- Click Add then OK
- If added successfully you should see the 3 libraries appear in the References folder
- Ensure that the following code is added to the namespace section at the top of the Program.cs file:
using Microsoft.AnalysisServices;
using Microsoft.AnalysisServices.Tabular;
Adding a Connection to the Tabular Server
We’re now ready to start adding C# code to connect to our Tabular server and create objects. Please note that all C# code is added between the parenthesis in the Main class within the Program.cs file:
static void Main(string[] args)
    {
        // ALL FOLLOWING CODE GOES HERE
    }
Create a Connection to the Tabular Server. Replace localhost with the name of your Tabular instance.
string ConnectionString = "DataSource=localhost";
    using (Server server = new Server())
    {
        server.Connect(ConnectionString);

        // ALL FOLLOWING CODE GOES HERE
    }
Defining a new Tabular Model
This will check if the database Wide World Imports exists on the server already, if it does then it’ll append an incremented number and still allow the database to be created.
string newDB = server.Databases.GetNewName("Wide World Importers");
    var blankdatabase = new Database()
    {
        Name = newDB,
        ID = newDB,
        CompatibilityLevel = 1200,
        StorageEngineUsed = StorageEngineUsed.TabularMetadata,
    };

blankdatabase.Model = new Model()
    {
        Name = "Wide World Importers Model",
        Description = "The Wide World Imports Tabular data model at the 1200 compatibility level."
    };
Defining a Tabular Data Source
This provides the Tabular model with a connection to the data source which contains the tables and data needed to populate our model. Note the ImpersonationMode setting, in this instance I’m using the service account that the Tabular service is running under, by default that is NT Service\MSSQLServerOLAPService. This service account has been added as a login to the SQL Server database engine instance and granted read permissions on the WideWorldImportersDW database.
blankdatabase.Model.DataSources.Add(new ProviderDataSource()
{
    Name = "WideWorldImportersDW_Source",
    ConnectionString = "Provider=SQLNCLI11;Data Source=localhost;Initial Catalog=WideWorldImportersDW;Integrated Security=SSPI;Persist Security Info=false",
    ImpersonationMode = Microsoft.AnalysisServices.Tabular.ImpersonationMode.ImpersonateServiceAccount,
 });
Defining Columns
We now define each of our columns used in our model, for each column we need the Name, DataType and SourceColumn properties to be populated. The use of the column will depend on the other properties that need setting. For example, each dimension table has a unique key column, this is represented by setting the IsUnique property to true.
Note that the Date_Month column is sorted by the Date_MonthNumber column, this ensures that the month names are sorted by calendar month and not alphabetically.
The available column properties are HERE.
 //COLUMN DEFINITIONS
 //DIMENSION TABLES
 //DATE
 DataColumn Date_Date = new DataColumn()
 {
     Name = "Date",
     DataType = DataType.DateTime,
     SourceColumn = "Date",
     IsUnique = true,
     FormatString = "yyyy-mm-dd",
 };

 DataColumn Date_MonthNumber = new DataColumn()
 {
     Name = "Month Number",
     DataType = DataType.Int64,
     SourceColumn = "MonthNumber",
     IsHidden = true,
 };

 DataColumn Date_Month = new DataColumn()
 {
     Name = "Month",
     DataType = DataType.String,
     SourceColumn = "Month",
     SortByColumn = Date_MonthNumber
 };

 DataColumn Date_Year = new DataColumn()
 {
     Name = "Year",
     DataType = DataType.String,
     SourceColumn = "Year",
 };

 //EMPLOYEE
 DataColumn Employee_EmployeeKey = new DataColumn()
 {
     Name = "Employee Key",
     DataType = DataType.Int64,
     SourceColumn = "EmployeeKey",
     IsHidden = true,
     IsUnique = true,
 };

 DataColumn Employee_EmployeeName = new DataColumn()
 {
     Name = "Employee Name",
     DataType = DataType.String,
     SourceColumn = "Employee",
 };

 DataColumn Employee_WWIEmployeeID = new DataColumn()
 {
     Name = "WWI Employee ID",
     DataType = DataType.Int64,
     SourceColumn = "WWIEmployeeID",
     SummarizeBy = AggregateFunction.None,
 };

 DataColumn Employee_IsSalesPerson = new DataColumn()
 {
     Name = "Is Sales Person",
     DataType = DataType.String,
     SourceColumn = "IsSalesPerson",
 };

 //FACT TABLE
 //ORDER
 DataColumn Order_SalesPersonKey = new DataColumn()
 {
     Name = "Sales Person Key",
     DataType = DataType.Int64,
     SourceColumn = "SalesPersonKey",
     IsHidden = true,
 };

 DataColumn Order_Date = new DataColumn()
 {
     Name = "Date",
     DataType = DataType.DateTime,
     SourceColumn = "OrderDateKey",
     IsHidden = true,
 };

 DataColumn Order_TotalExcludingTax = new DataColumn()
 {
     Name = "TotalExcludingTax",
     DataType = DataType.Decimal,
     SourceColumn = "TotalExcludingTax",
     IsHidden = true,
 };

 DataColumn Order_TaxAmount = new DataColumn()
 {
     Name = "TaxAmount",
     DataType = DataType.Decimal,
     SourceColumn = "TaxAmount",
     IsHidden = true,
 };

 DataColumn Order_TotalIncludingTax = new DataColumn()
 {
     Name = "TotalIncludingTax",
     DataType = DataType.Decimal,
     SourceColumn = "TotalIncludingTax",
     IsHidden = true,
 };
Defining Hierarchies
By using the Hierarchy class we’re able to define a 3 level hierarchy called Calendar Date which uses the Year, Month and Date columns. The Ordinal property sets the order in which the columns are placed, therefore Year-Month-Date is represented as 0-1-2.
 Hierarchy H1 = new Hierarchy()
 {
     Name = "Calendar Year",
 };

 H1.Levels.Add(new Level()
 {
     Column = Date_Year,
     Ordinal = 0,
     Name = Date_Year.Name
 });

 H1.Levels.Add(new Level()
 {
     Column = Date_Month,
     Ordinal = 1,
     Name = Date_Month.Name
 });

 H1.Levels.Add(new Level()
 {
     Column = Date_Date,
     Ordinal = 2,
     Name = Date_Date.Name
 });
Defining Tables
We now define the 3 tables used in our model, note that we are using the column and hierarchy names previously defined. The Orders table includes Measures, these measures are DAX calculations.
 //TABLES -------------------
 //DATE
 blankdatabase.Model.Tables.Add(new Table()
{
    Name = blankdatabase.Model.Tables.GetNewName("Date"),
    Partitions =
    {
        new Partition()
        {
            Name = "All Dates",
            Source = new QueryPartitionSource()
            {
                DataSource = blankdatabase.Model.DataSources["WideWorldImportersDW_Source"],
                Query = @"SELECT Date,Month,[Calendar Month Number] as MonthNumber,[Calendar Year] as Year
                          FROM Dimension.Date",
            }
        }
    },
    Columns =
    {
        Date_Date,
        Date_Year,
        Date_Month,
        Date_MonthNumber
    },
    Hierarchies =
    {
        H1
    }
});

//EMPLOYEE
blankdatabase.Model.Tables.Add(new Table()
{
    Name = blankdatabase.Model.Tables.GetNewName("Employee"),
    Partitions =
    {
        new Partition()
        {
            Name = "All Employees",
            Source = new QueryPartitionSource()
            {
                DataSource = blankdatabase.Model.DataSources["WideWorldImportersDW_Source"],
                Query = @"SELECT [Employee Key] as EmployeeKey,Employee,[WWI Employee ID] as WWIEmployeeID,CASE [Is Salesperson] WHEN 1 THEN 'Yes' ELSE 'No' end as IsSalesPerson
                          FROM Dimension.Employee",
            }
        }

    },
    Columns =
    {
        Employee_EmployeeKey,
        Employee_EmployeeName,
        Employee_WWIEmployeeID,
        Employee_IsSalesPerson
    }
});

//ORDERS
blankdatabase.Model.Tables.Add(new Table()
{
    Name = blankdatabase.Model.Tables.GetNewName("Orders"),
    Partitions =
    {
        new Partition()
        {
            Name = "All Orders",
            Source = new QueryPartitionSource()
            {
                DataSource = blankdatabase.Model.DataSources["WideWorldImportersDW_Source"],
                Query = @"SELECT [Salesperson Key] as SalesPersonKey,[Order Date Key] as OrderDateKey,[Total Excluding Tax] as TotalExcludingTax
                          ,[Tax Amount] as TaxAmount,[Total Including Tax] as TotalIncludingTax
                          FROM Fact.[Order]",
            }
        }
    },
    Columns =
    {
        Order_SalesPersonKey,
        Order_Date,
        Order_TotalExcludingTax,
        Order_TaxAmount,
        Order_TotalIncludingTax
    },
    Measures =
    {
        new Measure()
        {
            Name = "Total Excluding Tax",
            Expression = "SUM('Orders'[TotalExcludingTax])",
            FormatString = "#,###.##",
        },
        new Measure()
        {
            Name = "Tax Amount",
            Expression = "SUM('Orders'[TaxAmount])",
            FormatString = "#,###.##",
            DisplayFolder = "Tax",
        },
        new Measure()
        {
            Name = "Total Including Tax",
            Expression = "SUM('Orders'[TotalIncludingTax])",
            FormatString = "#,###.##",
        },
    }
});
Defining Relationships
As the Orders table is related to both the Date and Employee table, we need to add relationships to the model. The relationship cardinality is set consistent with Many-To-One relationships (Fact-to-Dimensions).
SingleColumnRelationship relOrderToDate = new SingleColumnRelationship()
{
    Name = "Order_Date_Date_Date",
    ToColumn = Date_Date,
    FromColumn = Order_Date,
    FromCardinality = RelationshipEndCardinality.Many,
    ToCardinality = RelationshipEndCardinality.One
};

blankdatabase.Model.Relationships.Add(relOrderToDate);

SingleColumnRelationship relOrderToEmployee = new SingleColumnRelationship()
{
    Name = "Order_EmployeeKey_Employee_EmployeeKey",
    ToColumn = Employee_EmployeeKey,
    FromColumn = Order_SalesPersonKey,
    FromCardinality = RelationshipEndCardinality.Many,
    ToCardinality = RelationshipEndCardinality.One
};

blankdatabase.Model.Relationships.Add(relOrderToEmployee);
Deploying the Tabular Model to the Server
At this point the model has not been deployed to the server yet, this next step does just that when the program is eventually executed.
try
{
    server.Databases.Add(blankdatabase);
    blankdatabase.Update(UpdateOptions.ExpandFull);

    Console.WriteLine("Deployed to server successfully");
}
catch
{
    Console.WriteLine("Deployed to server failed");
    return;
}
Loading Data into the Tabular Model
Once the model has been deployed, a data refresh operation is requested and executed.
blankdatabase.Model.RequestRefresh(Microsoft.AnalysisServices.Tabular.RefreshType.Full); //request data refresh
blankdatabase.Update(UpdateOptions.ExpandFull); //execute data refresh

Console.WriteLine("Data loaded...");
Output the Objects from the Tabular Model
We now output the objects created.
Console.Write("Database ");
Console.ForegroundColor = ConsoleColor.Green;
Console.Write(blankdatabase.Name);
Console.ResetColor();
Console.WriteLine(" created successfully.");

Console.WriteLine("The data model includes the following table definitions:");
Console.ForegroundColor = ConsoleColor.Yellow;
foreach (Table tbl in blankdatabase.Model.Tables)
{
    Console.WriteLine("\tTable name:\t\t{0}", tbl.Name);
    //Console.WriteLine("\ttbl description:\t{0}", tbl.Description);

    foreach (Measure measures in tbl.Measures)
    {
        Console.WriteLine("\tMeasure name:\t\t{0}", measures.Name);
    }

    foreach (Column columns in tbl.Columns)
    {
        Console.WriteLine("\tColumn name:\t\t{0}", columns.Name);
    }

    foreach (Hierarchy hierarchy in tbl.Hierarchies)
    {
        Console.WriteLine("\tHierachy name:\t\t{0}", hierarchy.Name);
    }
}

foreach (Relationship relationship in blankdatabase.Model.Relationships)
{
    Console.WriteLine("\tRelationship name:\t\t{0}", relationship.Name);
}
Console.ResetColor();
Console.WriteLine();

Console.WriteLine("Press Enter to close this console window.");
Console.ReadLine();
Run the Project
Now run the program (click Start or press F5) and the console should appear with messages indicating the actions performed.
Browse the Tabular Model
We can now connect to the model using a client tool such as Excel or Power BI Desktop and browse the objects. Power BI Desktop is a free download and available HERE.
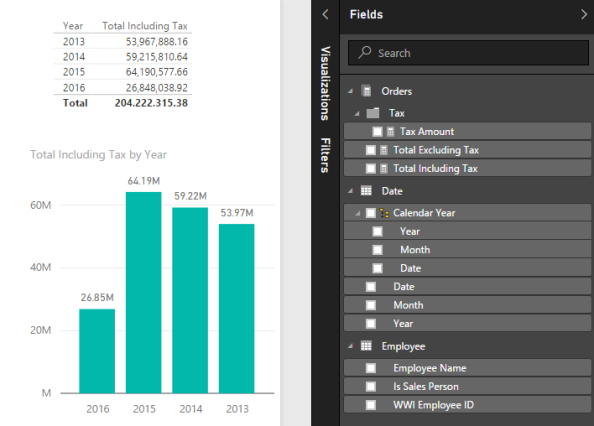
Browsing the Tabular model using Power BI Desktop
Next Steps
Now that we can create Tabular objects in this “version 1” project, a number of improvements present themselves:
- Use meta-data to drive the creation of objects, foreach loops would reduce the overall code size and enable dynamic object creation
- Possible use of SQL Server Extended Properties to drive the metadata
- Separate the Create and Load logic
- Error handling
Comments, suggestions and critique is encouraged and I thank you if you have read this far!
